How to like, comment, and add subscribers to shared photo albums on your iPhone, iPad, Mac, or PC

Making or subscribing to a shared photo album on iCloud is just the beginning: Once you're part of a shared album with your friends, family, or co-workers, you can add comments, like photos, invite more pals into the fray, and more.
If you want the social media experience without having to plaster your images across the internet, iCloud Photo Sharing offers some great tools for it. Here's how you can like your friends' images, add new people to an existing shared album, and add comment threads to photos and videos.
How to share albums with people who don't use iCloud
Want to share vacation images and videos with someone who doesn't have an iCloud address or an Apple iPhone? Apple makes it easy for you to show your photos and clips to others by creating an unlisted iCloud.com website for your album: All you need to do is give your friend the URL.
Unlike the Photos app, Apple's website won't allow users to like or comment on your images or video, and they won't be able to upload additional images or clips to the page. That said, they can still download a copy of the images onto their devices.
Note: Only the album owner and creator can change this setting. In addition, your album won't have any sort of privacy check beyond the private URL: Anyone with the link can access your images and video.
On your iPhone and iPad
- Launch the Photos app on your iPhone or iPad.
- Tap Albums at the bottom of the screen.
- Scroll down to Shared Albums and select the album for which you want to allow anyone to view photos from a web browser via iCloud.com. If you don't see the album right away, click See All and scroll through until you see the album you want.
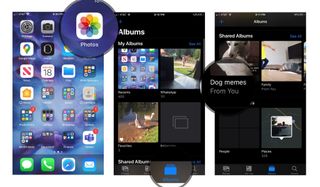
- Tap People icon at the top of the screen.
- Toggle the Public Website switch on to allow anyone with the URL access to the shared album from a web browser.
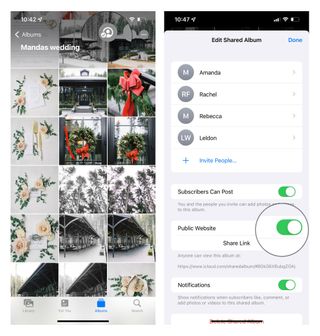
Once you've turned on the website function, you can share it with anyone by copying the album link.
On your Mac
- Launch the Photos app.
- Open the Shared album.

- Click on the People button in the toolbar.
- Check the box next to Public Website to allow anyone with the URL access to the shared album from a web browser.

How to add someone to a shared photo album
Want to show a new person the photos and videos you've added to an existing shared album? It only takes a few clicks.
Master your iPhone in minutes
iMore offers spot-on advice and guidance from our team of experts, with decades of Apple device experience to lean on. Learn more with iMore!
Note: Only the album creator and owner can add new people to a shared album — make sure whoever creates the album doesn't mind adding new people over time!
On your iPhone and iPad
- Launch the Photos app from your Home screen.
- Tap Albums at the bottom of your screen.
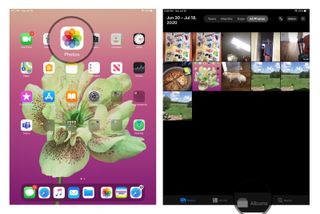
- Scroll down to Shared Albums and tap the album you would like to access.
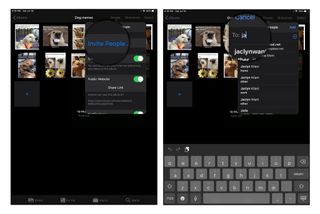
- Tap People.
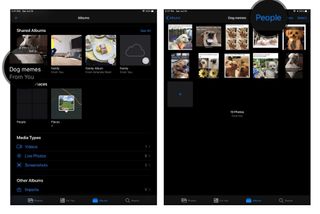
- Tap Invite People...
- Type in the name of the person you'd like to invite.
On your Mac
- Launch the Photos app.
- Open the Shared album in question.

- Click on the People button in the toolbar.
- Click on the box that says Invite People.
- Add the iCloud email address of the person in question.
- Press the Return key on your keyboard.

How to remove someone from a shared photo album
Whether you accidentally invited someone to the wrong shared album or you just don't want them to have access anymore, you can get rid of a subscriber to a shared album pretty quickly.
Note: Only the creator and owner of the shared album can change this setting.
On your iPhone or iPad
- Launch the Photos app from your Home screen.
- Tap Albums at the bottom of your screen.
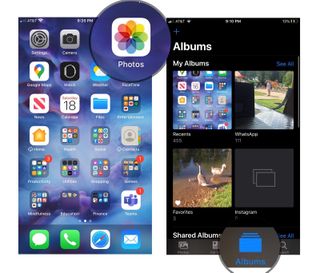
- Tap the shared album you would like to access.
- Tap People.

- Tap the name of the person you'd like to remove.
- Tap Remove Subscriber at the bottom of the window on your screen.
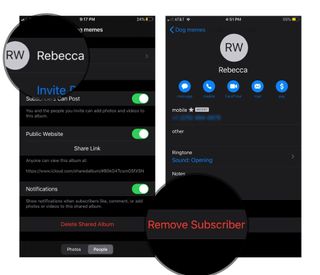
A prompt will appear, so just tap Remove again to take them out of that shared album completely. The person will no longer be able to access the shared album.
On your Mac
- Launch the Photos app.
- Open the Shared album in question.
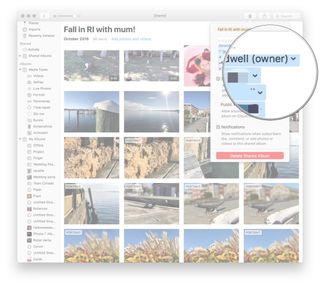
- Click on the People button in the toolbar.

- Click on arrow next to the subscriber you wish to remove.
- Press Remove Subscriber.
How to let other people add photos and video to your shared photo album
iCloud's photo sharing service isn't just a one-way trip: You can create collaborative shared albums so that everyone can contribute. Whether you want to collectively share vacation photos with your family or are collaborating with work friends, everyone can upload to the same shared album. Here's how.
Note: Only the creator and owner of the shared album can change this setting.
On your iPhone and iPad
- Launch the Photos app on your iPhone or iPad.
- Tap Albums at the bottom of the screen.
- Scroll down to Shared Albums and select the album. If you don't see the album right away, click See All and scroll through until you see the album you want.

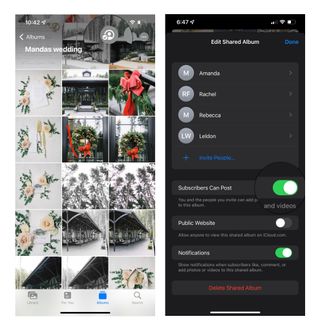
- Tap People icon at the top of the screen.
- Toggle the switch Subscribers can Post on to allow others to add their photos to your shared Photo Stream.
On your Mac
- Launch the Photos app.
- Open the Shared album.
- Click on the People button in the toolbar.

- Check the box next to Subscribers Can Post to allow anyone to contribute to the album.

How to like or comment on photos or videos in a shared photo album
Turn iCloud into your own private social network with its liking and commenting features: When you open a photo or video in a shared album, you'll be able to like and comment on them, just as you would on a service like Facebook or Instagram. It's just more private.
On your iPhone or iPad
- Launch the Photos app on your iPhone or iPad.
- Tap Albums at the bottom of the screen.
- Scroll down to Shared Albums and select the album. If you don't see the album right away, click See All and scroll through until you see the album you want.

- Select a photo.
- Tap Like in the bottom right corner to like the photo.
- Tap Add a comment in the bottom middle to add a comment.
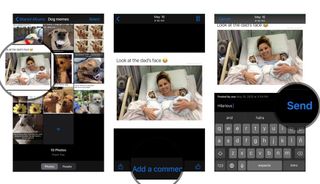
You can also hide all comments in a shared Photo Stream by tapping Hide Comments under a photo that has a comment attached to it.
On your Mac
- Launch the Photos app.
- Open the Shared album.
- Select a photo or video you wish to like or comment on.
- Press the Speech Bubble icon in the lower-left corner to add a like or comment.
- Press the smiley face to Like the post.
- Tap the Add a comment field to add your comment.

How to disable notifications for a shared photo album
If people are frequently adding images to or liking photos in a shared photo album over a short period of time, you might not want to repeatedly get notifications. Here's how to shut off notifications for a single album.
On your iPhone or iPad
- Launch the Photos app on your iPhone or iPad.
- Tap Albums at the bottom of the screen.
- Scroll down to Shared Albums and select the album for which you want to allow anyone to view photos from a web browser via iCloud.com. If you don't see the album right away, click See All and scroll through until you see the album you want.

- Tap on the shared album you'd like to stop notifications for.
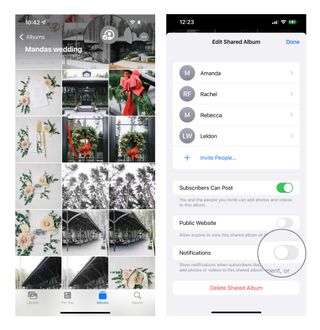
- Tap on People.
- Turn Off the option for Notifications.
On your Mac
- Launch the Photos app.
- Open the Shared album.
- Click on the People button in the toolbar.

- Un-check the box next to Notifications to turn off notifications for this album.

How to disable all shared photo album notifications
Don't want to see notifications for any Photos-related content? You can shut off these notifications entirely by adjusting your settings.
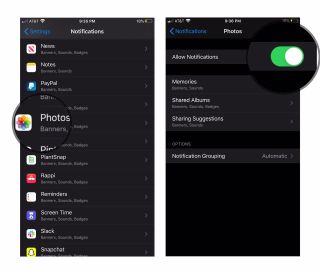
On your iPhone or iPad
- Launch the Settings app on your iPhone or iPad.
- Tap on Notifications.
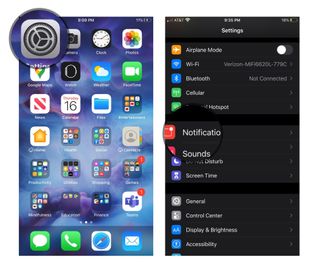
- Tap Photos.
- Turn Off the types of notifications you don't want to receive. That can be badges, sounds, banners, or other options. You can also disable Photos app notifications completely by using the first toggle.
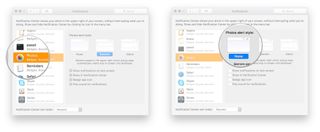
On your Mac
- Open the System Preferences app.
- Go to the Notifications tab.
- Select the Photos notifications pane.
- Turn off all notification settings for Photos.
Ready to roll
With all of these easy-to-follow steps, you'll be connecting with family and friends in your shared albums in no time. Avoid all the stress and hassle of social media with this fun and convenient feature.
Updated February 2022: Updated to a new format and replaced outdated screenshots.

○ Should you use it?
○ iCloud Photo Library and Photo Stream: What's the difference?
○ Which storage plan should you choose?
○ How to use it on iPhone and iPad
○ How to use it on your Mac or PC
○ How to access it on the web
○ How to view images while offline
○ How to use Family Sharing with iCloud
○ How to free up storage space on your iPhone
○ How to transfer photos from your Mac or PC
○ How to recover deleted images and video
○ How to back up iCloud Photo Library
○ Troubleshooting iCloud Photo Library
Lory is a renaissance woman, writing news, reviews, and how-to guides for iMore. She also fancies herself a bit of a rock star in her town and spends too much time reading comic books. If she's not typing away at her keyboard, you can probably find her at Disneyland or watching Star Wars (or both).
Most Popular


